The Wanderer
We all live for the sun, but in our dry brown land it can be relentless and unforgiving - particularly in arid desert regions and tropical zones which are characterised by intense heat.
And for those RVers and caravanners with a penchant for relaxing outdoors, the omnipresent nearside awning is a godsend - a shady saviour!
But the installation of an offside external rope track, which allows attachment of a shade cloth awning or the like, will help you beat the sun on both sides of your RV.
It can also assist in taking the heat off the back of the fridge, and shade the window over an offside kitchen sink. And also help keep the RV a bit cooler.
These images and step-by-step captions depict the simplicity of this installation of an offside external rope track performed by The RV Repair Centre foreman, Paul Hewat, in Bayswater, Victoria.
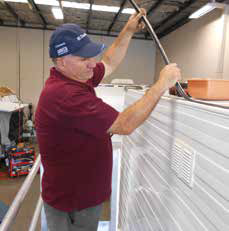
In this specific DIY project the new aluminium white rope track is to be installed on the ‘offside’ of a motorhome or caravan to provide shade when required. Whilst the rope track could be installed on the side wall rather than the roof, our experience has found that the roof provides greater support. Cut and remove the corner moulding infill as shown.

Determine the overall length of the rope track required. This may be determined by the size of shade awning you have or intend to purchase. Although it’s normal practice to run the rope track the full length of the roof.

Measure the length of rope track required. Handy hint: Ensure the length of rope track purchased is longer than the measured length required.

Cut rope track to the measured length.

Pre-drill the rope track on a flat surface prior to installing. Whilst 400mm spacings are okay along the rope track, ensure each end is no greater than 25mm as shown within the image. Handy hint: Flat file each hole once drilled.

Use a small round file to remove rough edges at each end of the rope track.

Use methylated spirits (not turpentine) to clean all surfaces as shown.

Use a good quality roof/gutter sealant and run this within the corner moulding as shown from front to rear.

Place the rope track ‘reverse up’ as shown as it provides for a cleaner finish. Handy hint: Ensure the rope track is flush against the corner moulding by using excess sealant as shown.

Fasten the rope track commencing from one end as shown here. Handy hint: Use your free hand to hold the rope track against the corner mould.

Once the rope track is fully fastened apply a coating of sealant into the groove as shown here.

Using your finger or a flat blade, level off the area applied with sealant. Handy hint: Ensure the fasteners are also covered with sealant.

Wipe off any excess sealant. Then reposition the corner moulding infill so it butts up against the rope track. Cut as shown here. Handy hint: Apply sealant under the corner mould infill before reinstalling.

The completed project in readiness for the shade cloth awning to slide into your new rope track. Handy hint: Rope track can be applied to any RV with or without corner moulds. It’s also imperative that rope track is fastened to a structural member to provide rigidity.
Category: Advice
Written: Sat 31 Mar 2018
Printed: April, 2018
Published By:
